Stand Out Beach Boy abilities and hook depth
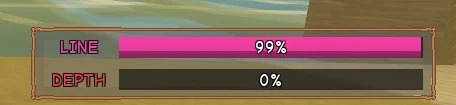
In Stand Out, Beach Boy turns a catch into a sequence of decisions: steer or quickcast the hook, reel to build depth, select a body part, then decide whether to tear it out or keep fishing. It can also move you toward large objects. Ability increases line length and reel strength; 225 studs is the maximum scaled reach, not a guaranteed starting range. Strength makes the hook sink faster.
The line is also an attack route. You and allies can strike it to damage the hooked person, and Hamon travels along it. Protect your own position while maintaining a catch: ragdoll or heavy knockback releases the target, even during Focused Fishing. A target can also escape by moving too far beyond the line’s reach.
Cast and reel controls
Scroll to see every column.
| Action | Input / base cooldown | Operation |
|---|---|---|
| Cast Out | Ctrl · 1s | Steer through walls and floors. Use again to stop steering; use again to resume. A heavy attack reels the hook back. |
| Quickcast | 6s | Send the hook toward your aim in a shallow arc. It catches people, sticks in large objects or remains where it lands. |
| Reel / Quick Pull | Hold M1 / R · cooldown: Not listed | On a large object, hold M1 to pull yourself toward it or use R for a quick pull. On a person, reeling builds depth. |
| Double Snag | 12s | Whip twice; both hits cause bleeding. An existing catch is torn out, then a re-hook is attempted at half depth. |
| Set the Hook | 16s | Add 25% depth and fling the catch. Move sideways to throw left or right; otherwise pull them back. Can break walls with the catch. |
| Target Swap | 2s | Select heart, head, arm or leg; retain 75% of current depth. |
Not listed means no cooldown is supplied, rather than zero. While steering inside a wall or underground, Good Vibrations shows nearby people as pink squares and loose objects as pale squares. Use those markers to distinguish a person from a possible movement anchor before committing your reel.
For movement, first catch a large object such as a car, then choose sustained M1 reeling or the quicker R pull. For a person, keep M1 held when your goal is depth. The same buttons serve different purposes according to what the hook has caught; check the catch before choosing your next input.
Depth, target swap and the 25% tear threshold
Read DEPTH for removal thresholds: LINE and DEPTH are separate HUD readings. More reach does not itself satisfy a depth requirement. Holding M1 reels a person closer while increasing depth, which strengthens the slow and the damage dealt on removal. R tears the hook out once depth is at least 25%.
Scroll to see every column.
| Target | What changes | When choosing it matters |
|---|---|---|
| Heart | Removal causes bleeding. | Required target for Fish Filet’s low-health finisher. |
| Head | Takes longer to reach; removal blinds and briefly stuns. | Allow for the slower depth setup before pulling. |
| Arm | Reached faster; slows attacks. | Choose attack disruption rather than movement control. |
| Leg | Reached faster; stronger movement slow; removal trips. | Choose control over the catch’s movement. |
Swap before committing to a removal effect. Keeping 75% means losing one quarter of the depth you currently have, so recheck the meter after changing targets. Double Snag is a different trade: it tries to re-hook at half depth after tearing out the existing hook. Neither operation preserves full depth. If your next action needs a threshold, rebuild after the change instead of using the old meter reading.
For My Bro! marks anyone who kills a party member for 20 seconds; your hook sinks into that marked person 50% faster. This is a conditional depth advantage, not a permanent increase against everyone. Set the Hook offers another depth tool and directional throw: move sideways for a left or right fling, and consider the breakable wall’s position before using it.
EX decisions and the 100% heart threshold
Scroll to see every column.
| Move | Cost / base cooldown | Condition and decision |
|---|---|---|
| Focused Fishing | Continuous EX drain · 3s | Hold for faster reeling and deeper sinking. Manual hook movement is unavailable while it is active. Heavy knockback and ragdoll still release it. |
| Fatal Resolve | 1 bar · 8s | Stomp ahead to finish downed enemies and knock standing enemies away. Works summoned or dismissed and uses its own input. |
| Trophy Catch | 3 bars · 18s | Slam a plaque bearing your last kill, then pick it up and throw it. With no kills, it shows Bill. |
| Fish Filet | 2 bars · 14s | Try to remove an eye or limb; chance rises with depth. Heart causes bleeding and finishes at 100% depth when target health is 20% or less. Can be perfect blocked. |
Treat the two removal thresholds separately. At 25% depth, ordinary R can tear the hook out. The heart finisher on Fish Filet needs 100% depth and a target at 20% health or below. Being low on health alone is insufficient, and full depth on the wrong body part does not meet the heart condition. Eye and limb removal remain attempts with better chances at greater depth; the card gives no numerical probability.
Before spending two bars, check target part, current depth and health together. If a swap lowered depth, reel again. If the catch broke, reacquire rather than expecting the old setup to carry over. Even when the finisher conditions are met, the perfect-block restriction remains; this is not an unavoidable execution.
Why did the catch or finisher fail?
Catch released while Focused Fishing? Check for ragdoll, heavy knockback or excess distance. Focused Fishing accelerates reeling; it does not protect the catch from those release conditions. R did not tear out the hook? Read DEPTH rather than LINE and check the 25% requirement. Fish Filet did not finish? Check heart selection, 100% depth and the 20% health limit, then account for perfect blocking.
Depth fell after an action? Target Swap retains 75%, while Double Snag attempts a re-hook at half depth. These are distinct changes, so the next pull should use the new reading. A nearby marker did not become a person catch? Pink squares identify people; pale squares identify loose objects during underground or in-wall steering.
Rarity and storage
The card labels Beach Boy Part 5 and Rare. Compare arrow tiers and crafting separately from this hook workflow; a tier label is not a per-Stand probability. D’Arby at the Docks handles Stand Storage and chips. Save a wanted kit before replacing it: using a chip permanently replaces the equipped Stand.
Sources
Sources checked November 15, 2026. Beach Boy primary moveset card.